
The Space Time Journey : Creating a Celestial Masterpiece with Oil Pastels: A Step-by-Step Guide by The Jasoos Arts

Welcome to the Artistic World of The Jasoos Arts, where we blend creativity and craftsmanship to bring you stunning works of art. Today, we are excited to share the detailed process of creating The Space time journey , a mesmerizing oil pastel painting that captures the magic of the cosmos. This piece, characterized by its vibrant colors and intricate textures, showcases the boundless beauty of the universe.
Inspiration
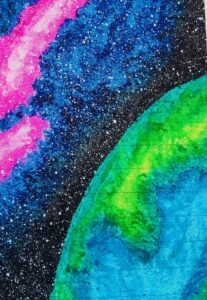
The space time journey
Inspired by the infinite expanse of the sky and the vibrant colors of distant galaxies, this space painting seeks to evoke a sense of wonder and exploration. The swirling hues and celestial bodies remind us of the vastness of space and the mysteries it holds. Let’s dive into the step-by-step process of creating this cosmic masterpiece named the space time journey.
Materials Needed
– Oil pastels (assorted colors)
– High-quality drawing paper or pastel paper
– Blending stumps or soft cloth
– Fixative spray (optional)
– Pencil and eraser
– Ruler (for sketching geometric elements, if needed)
Step-by-Step Process
1. Preparing the Canvas
Begin with a clean, high-quality piece of drawing paper. For oil pastels, a textured surface like pastel paper works best as it holds the pigment better and allows for richer color application.
2. Sketching the Layout
Using a pencil, lightly sketch the main elements of your composition. In this painting, the focus is on a section of the Earth set against a backdrop of swirling galaxies. Ensure the layout is balanced, leaving enough space for both the planetary elements and the vibrant cosmic background.
3. Creating the Background
– Base Layer:
Start with the background, which will represent the deep space. Use dark shades of blue, black, and purple oil pastels to fill in the background. Apply the colors in a circular, swirling motion to mimic the appearance of distant galaxies.
– Blending:
Blend the colors using a blending stump or a soft cloth to create smooth transitions and depth. Work in layers, adding more color and blending until you achieve a rich, textured background.
4. Adding the Galaxy
– Galactic Swirls:
Introduce brighter colors like pink, light blue, and turquoise to create the swirling galaxies. Apply these colors in curved, flowing lines to represent the spiraling arms of the galaxies.
– Blending:
Blend these colors gently into the dark background, maintaining the swirling effect. You can use a combination of your fingers and blending stumps to achieve the desired texture.
5. Detailing the Earth
– Base Colors:
For the section of the Earth, start with base colors such as green and blue to represent land and water. Apply these colors in patches, following the natural contours of the planet.
– Texture and Depth:
Add darker shades of green and blue to create depth and dimension. Blend these shades using a blending stump to achieve a realistic texture.
– Highlights:
Use lighter shades and a white pastel to add highlights, giving the appearance of sunlight reflecting off the Earth’s surface.
6. Enhancing the Night Sky
– Stars and Galaxies:
To enhance the night sky, add small dots and streaks of white pastel to represent stars. Use a splattering technique for a more natural starry effect: scrape a bit of white pastel onto a toothbrush and flick the bristles to scatter fine dots across the background.
– Nebulas:
Introduce patches of light pink, purple, and white to create glowing nebulas within the galaxy. Blend these lightly into the surrounding colors.
7. Final Touches
– Refinement:
Go over the painting, adding more color or blending where necessary to refine the overall look. Pay attention to the contrast between the vibrant galaxies and the darker space to ensure the elements stand out.
– Fixative Spray:
Once satisfied, use a fixative spray to set the oil pastels and prevent smudging. This step is optional but recommended for preserving your artwork.
8. Signing and Display
Finally, sign your masterpiece! Frame it or display it as desired, and enjoy the cosmic beauty you’ve brought to life.
Conclusion
Creating this oil pastel painting was a journey through the cosmos, blending colors and textures to capture the universe’s awe-inspiring beauty. At The Jasoos Arts, we believe in the transformative power of art to inspire and uplift. We hope this guide encourages you to explore your creativity and create your own celestial masterpieces. Happy painting!
Also read –
Handmade wedding calendar – Jassos Arts (thejasoosarts.com)